
Well, if you want to have a secure connection to your dockstar or even your home net, this post describes all steps you have to take to get this done. In my setup I have a dd-wrt router connected to the internet and forwarding all needed ports to the dockstar. You probably don’t use a firewall on the debian machine, but you will have to, because we need package forwarding to reach the home net through the VPN tunnel. I assume you don’t use your dockstar as the default gateway for your LAN, so you will need an additional route in the router:
Let me explain the path of the packages of a ping from a remote machine to a host in the LAN. For the different subnets refer to the exhibit (VPN: 10.8.0.0/24; LAN: 192.168.0.0/24).
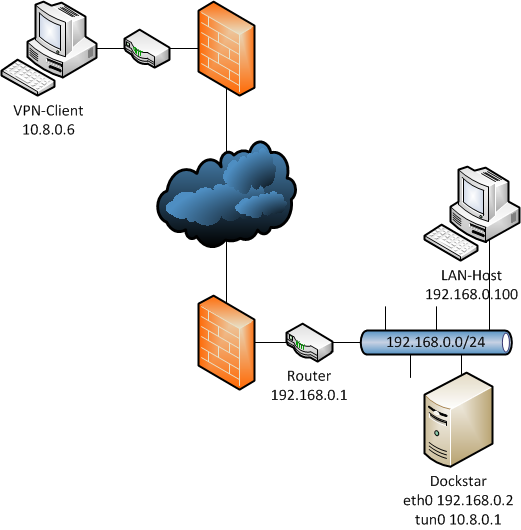
Let us ping the hostaddress 192.168.0.100 from 10.8.0.6. The ping starts at the VPN-client 10.8.0.6 into the vpn tunnel to the tun device on the dockstar 10.8.0.1. The VPN-client knows about the LAN, because it gets pushed a valid route by the openvpn-server.
The dockstar directly forwards the icmp-package to the LAN-host. Assuming the LAN-host’s firewall doesn’t block packages from/to 10.8.0.0/24, it will send out the respond-package to its default gateway (192.168.0.1) because the lan hosts doesn’t know anything about the VPN.
Well, by default the router doesn’t know the VPN either and will forward the package to its default gateway, yes, its the first hop of your ISP! So we need to redirect packages to 10.8.0.0/24 back to the dockstar. Now the additional route in the router comes to work. In dd-wrt you can set it in the web interface: Setup->Advanced Routing. The icmp-package will be send to dockstar’s eth0 (192.168.0.2) and forwarded to the VPN-client (10.8.0.6).
With this knowledge we are ready to install and configure openvpn and the firewall e.g. iptables.
1. OpenVPN
First of all we need to install the package:
apt-get install openvpn
1.1 Configure the Server
The configuration files are stored in /etc/openvpn. If you want to run multiple servers you simple create a serverX.conf for each server. In my case I’m running one UDP server, the config file is called tun0.conf and looks like this:
dev tun0
tun-mtu 1200
proto udp
local 192.168.0.2 #lan ip of the dockstar
port 1194
server 10.8.0.0 255.255.255.0

# we will create these files later, remember to change the names if you create different keys
ca /usr/share/doc/openvpn/examples/easy-rsa/2.0/keys/ca.crt
cert /usr/share/doc/openvpn/examples/easy-rsa/2.0/keys/myServer.crt
key /usr/share/doc/openvpn/examples/easy-rsa/2.0/keys/myServer.key
dh /usr/share/doc/openvpn/examples/easy-rsa/2.0/keys/dh1024.pem

client-to-client #clients can communicate
comp-lzo
verb 3 # loglevel
mute 50
keepalive 10 60

# enable the following two lines if you want your traffic through vpn
#push "redirect-gateway def1"
#push "dhcp-option DNS 192.168.0.1"

push "route 192.168.0.0 255.255.255.0" #notify VPN-clients about the lan
push "dhcp-option WINS 10.8.0.1" #I got samba running with WINS for netbios-names through VPN
ifconfig-pool-persist ipp.txt
status openvpn-status.log

duplicate-cn #one cert, multiple clients
1.2 Build the Certificates and Keys
We will do this with easy-rsa which comes with openvpn:
cd /usr/share/doc/openvpn/examples/easy-rsa/2.0/
You may want to edit vars first to get your own defaults:
vim vars
# These are the default values for fields
# which will be placed in the certificate.
# Don't leave any of these fields blank.
export KEY_COUNTRY="DE"
export KEY_PROVINCE="yourProvince"
export KEY_CITY="yourCity"
export KEY_ORG="example"
export KEY_EMAIL="[email protected]"
Now we will create the certificate for CA:
. ./vars
./clean-all
./build-ca
Then we will create the certificate for the server:
./build-key-server myServer
Then we will create the certificate for client (you can build one for each vpn-client in order not to share them):
./build-key client1
We will build diffie hellman
./build-dh
Now all keys are built, you should have these files:
ls keys/
ca.key ca.crt myServer.key myServer.csr myServer.crt client1.key client1.crt client1.csr
Now we have the keys and certificates. So we will put them to our clients who want to connect to the vpn. Just be sure that you only copy these files to the clients:
- client1.crt
- client1.key
- ca.crt
1.3 Configure the Client
A minimal client.conf could look like this:
client
dev tun
proto udp
remote foobar.dyndns.org 1194
nobind
ca ca.crt
cert client1.crt
key client1.key
comp-lzo
verb 3
2. Some Firewall Rules
If you don’t have a firewall running just install it:
apt-get install iptables
As mentioned above we need the packages forwarded to enable the communication between the VPN and the LAN.
To permanently set net.ipv4.ip_forward=1 uncomment this line:
vim /etc/sysctl.conf
# Uncomment the next line to enable packet forwarding for IPv4
net.ipv4.ip_forward=1
Add these rules to your firewall-script (tun+ is a wildcard for all tun-devices, $device is set to eth0):
# Allow TUN interface connections to OpenVPN server
iptables -A INPUT -i tun+ -j ACCEPT
iptables -A OUTPUT -o tun+ -j ACCEPT

# Allow TUN interface connections to be forwarded through other interfaces
iptables -A FORWARD -i tun+ -j ACCEPT
iptables -A FORWARD -i tun+ -o $device -m state --state RELATED,ESTABLISHED -j ACCEPT
iptables -A FORWARD -i $device -o tun+ -m state --state RELATED,ESTABLISHED -j ACCEPT

iptables -t nat -A POSTROUTING -o $device -s 10.8.0.0/24 -j MASQUERADE
In case you don’t want to set up a script from scratch, this is mine, so some of you might say its a bit overloaded 😅 But… security first.
This is a fully working init-script, (/etc/init.d/firewall)
#!/bin/bash
# ---------------------------------------------------------------------
# Linux-iptables-Firewallskript, Copyright (c) 2009 under the GPL
# Autogenerated by iptables Generator v1.22 (c) 2002-2009 by Harald Bertram
# Please visit http://harry.homelinux.org for new versions of
# the iptables Generator (c).
#
# This Script was generated by request from:
# [email protected] on: 2009-7-10 15:53.3 MET.
#
# If you have questions about the iptables Generator or about
# your Firewall-Skript feel free to take a look at out website or
# send me an E-Mail to [email protected].
#
# My special thanks are going to Lutz Heinrich (trinitywork at hotmail dot c$
# who made lots of Beta-Testing and gave me lots of well qualified
# Feedback that made me able to improve the iptables Generator.
# --------------------------------------------------------------------
### BEGIN INIT INFO
# Provides: firewall
# Required-Start: $remote_fs $syslog
# Required-Stop: $remote_fs $syslog
# Default-Start: 2 3 4 5
# Default-Stop: 0 1 6
# Short-Description: Start daemon at boot time
# Description: Enable service provided by daemon.
### END INIT INFO

# iptables suchen
iptables=`which iptables`

# Device festlegen
# device="eth0" // Nur wenn vorhanden !
device="eth0"

# wenn iptables nicht installiert abbrechen
test -f $iptables || exit 0

case "$1" in
start)
echo "Starte IP-Paketfilter"

# Tabelle flushen
iptables -F
iptables -t nat -F
iptables -t mangle -F
iptables -X
iptables -t nat -X
iptables -t mangle -X

# Default-Policies setzen
iptables -P INPUT DROP
iptables -P OUTPUT DROP
iptables -P FORWARD DROP

# MY_REJECT-Chain
iptables -N MY_REJECT

# MY_REJECT fuellen
iptables -A MY_REJECT -p tcp -m limit --limit 7200/h -j LOG --log-prefix "REJECT TCP "
iptables -A MY_REJECT -p tcp -j REJECT --reject-with tcp-reset
iptables -A MY_REJECT -p udp -m limit --limit 7200/h -j LOG --log-prefix "REJECT UDP "
iptables -A MY_REJECT -p udp -j REJECT --reject-with icmp-port-unreachable
iptables -A MY_REJECT -p icmp -m limit --limit 7200/h -j LOG --log-prefix "DROP ICMP "
iptables -A MY_REJECT -p icmp -j DROP
iptables -A MY_REJECT -m limit --limit 7200/h -j LOG --log-prefix "REJECT OTHER "
iptables -A MY_REJECT -j REJECT --reject-with icmp-proto-unreachable

# MY_DROP-Chain
iptables -N MY_DROP
iptables -A MY_DROP -m limit --limit 7200/h -j LOG --log-prefix "PORTSCAN DROP "
iptables -A MY_DROP -j DROP

# Alle verworfenen Pakete protokollieren
iptables -A INPUT -m state --state INVALID -m limit --limit 7200/h -j LOG --log-prefix "INPUT INVALID "
iptables -A OUTPUT -m state --state INVALID -m limit --limit 7200/h -j LOG --log-prefix "OUTPUT INVALID "

# Korrupte Pakete zurueckweisen
iptables -A INPUT -m state --state INVALID -j DROP
iptables -A OUTPUT -m state --state INVALID -j DROP

# Stealth Scans etc. DROPpen
# Keine Flags gesetzt
iptables -A INPUT -p tcp --tcp-flags ALL NONE -j MY_DROP

# SYN und FIN gesetzt
iptables -A INPUT -p tcp --tcp-flags SYN,FIN SYN,FIN -j MY_DROP

# SYN und RST gleichzeitig gesetzt
iptables -A INPUT -p tcp --tcp-flags SYN,RST SYN,RST -j MY_DROP

# FIN und RST gleichzeitig gesetzt
iptables -A INPUT -p tcp --tcp-flags FIN,RST FIN,RST -j MY_DROP

# FIN ohne ACK
iptables -A INPUT -p tcp --tcp-flags ACK,FIN FIN -j MY_DROP

# PSH ohne ACK
iptables -A INPUT -p tcp --tcp-flags ACK,PSH PSH -j MY_DROP

# URG ohne ACK
iptables -A INPUT -p tcp --tcp-flags ACK,URG URG -j MY_DROP

# Loopback-Netzwerk-Kommunikation zulassen
iptables -A INPUT -i lo -j ACCEPT
iptables -A OUTPUT -o lo -j ACCEPT

# Connection-Tracking aktivieren
iptables -A OUTPUT -m state --state NEW,ESTABLISHED,RELATED -j ACCEPT
iptables -A INPUT -m state --state ESTABLISHED,RELATED -j ACCEPT

# ICMP Ping erlauben
iptables -A INPUT -p icmp --icmp-type echo-reply -j ACCEPT
iptables -A OUTPUT -p icmp --icmp-type echo-reply -j ACCEPT
iptables -A INPUT -p icmp --icmp-type destination-unreachable -j ACCEPT
iptables -A OUTPUT -p icmp --icmp-type destination-unreachable -j ACCEPT
iptables -A INPUT -p icmp --icmp-type source-quench -j ACCEPT
iptables -A INPUT -p icmp --icmp-type echo-request -j ACCEPT
iptables -A OUTPUT -p icmp --icmp-type echo-request -j ACCEPT
iptables -A INPUT -p icmp --icmp-type time-exceeded -j ACCEPT
iptables -A INPUT -p icmp --icmp-type parameter-problem -j ACCEPT

# SSH
iptables -A INPUT -i $device -m state --state NEW -p tcp --dport 22 -j ACCEPT

#!!!! remember to open all ports you need !!!!

### OpenVPN
iptables -A INPUT -i $device -m state --state NEW -p udp --dport 1194 -j ACCEPT

# Allow TUN interface connections to OpenVPN server
iptables -A INPUT -i tun+ -j ACCEPT
iptables -A OUTPUT -o tun+ -j ACCEPT

# Allow TUN interface connections to be forwarded through other interfaces
iptables -A FORWARD -i tun+ -j ACCEPT
iptables -A FORWARD -i tun+ -o $device -m state --state RELATED,ESTABLISHED -j ACCEPT
iptables -A FORWARD -i $device -o tun+ -m state --state RELATED,ESTABLISHED -j ACCEPT

iptables -t nat -A POSTROUTING -o $device -s 10.8.0.0/24 -j MASQUERADE

# Default-Policies mit REJECT
iptables -A INPUT -j MY_REJECT
iptables -A OUTPUT -j MY_REJECT
;;

stop)
echo "Stoppe IP-Paketfilter"
# Tabelle flushen
iptables -F
iptables -t nat -F
iptables -t mangle -F
iptables -X
iptables -t nat -X
iptables -t mangle -X
# Default-Policies setzen
iptables -P INPUT ACCEPT
iptables -P OUTPUT ACCEPT
iptables -P FORWARD ACCEPT
;;

restart)
echo "Restarte IP-Paketfilter"
$0 stop
$0 start
;;

status)
echo "Tabelle filter"
iptables -L -vn
echo "Tabelle nat"
iptables -t nat -L -vn
echo "Tabelle mangle"
iptables -t mangle -L -vn
;;

*)
echo "Fehlerhafter Aufruf"
echo "Syntax: $0 {start|stop|restart|status}"
exit 1
;;

esac
If you use this script don’t forget to make it executable.
3. Restart the Services
Now we are ready to restart the services and run a first test:
service openvpn restart
service firewall restart
If everything works you should be able to ping around your VPN and your LANs. For additional understanding the routes take a look at a traceroute.